Showing posts with label Militia. Show all posts

Thursday, 24 March 2016

Force on Force AAR: Closing Up Shop

Vlad and I tackled one of the scenarios from the Day of the Rangers book, entitled 'Closing up Shop'. This is a scenario for Somalia 1993 but is transposes effortlessly to the modern day Democratic Republic of Zugando.

I this scenario Vlad took command of a full squad (three Fire Teams) of US marines as they attempted to drive the PRA rebels out of a neighbourhood of Churchill. Intel picked up by the CIA agent James managed to rescue in the last encounter (see Contracting Troubles AAR) has indicated that the rebels have a large cache of munitions stored in a compound in the George Street district. Due to the compounds close proximity to the UN sponsored girls school battalion command has judged it unwise to destroy it from the air, and so has tasked a marine squad to move in and destroy the munitions manually. It is expected that their will be PRA militia in the area, and that the neighbourhood will be hostile to the Americans. 

Vlad has six turns to complete his mission. He will score 5 VP for destroying the cache, 4 VP's for exiting the board on turn 4, or just 2 for exiting turn 6. 

The PRA will score 5 VP if the cashe is not destroyed, 3VP for each marine killed, 5VP for each marine captured, and 1 VP for each civilian killed by the marines.

As usual we played with 28mm, on a 4x4 board and doubled up the ranges of Movement and Optimum Range. 
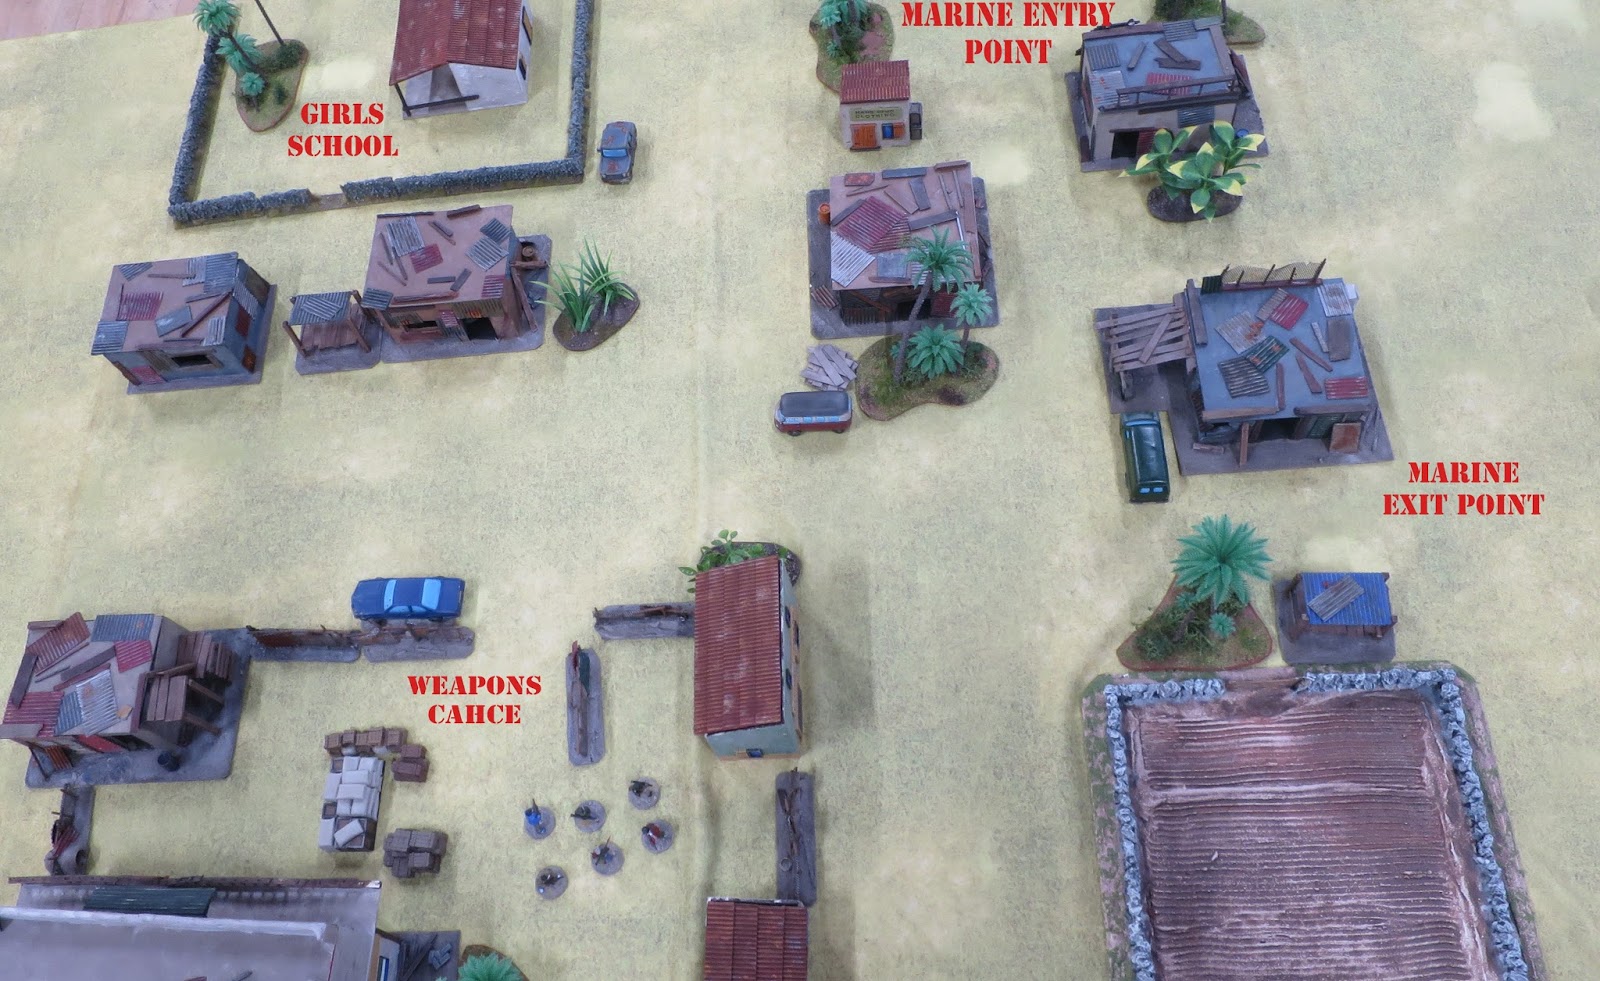


PRA guards in the compound
The Munitions Cache
 Vlad began by bringing his marines on through the shanty town, avoiding the main roads and maximising cover. There was little I could do to stop his advance as he was careful to avoid line of sight to my men. His men took up advantageous positions covering the compound


Marines advancing through the neighbourhood

Unfortunately for the marines the alarm was raised and soon a large group of PRA rebels, hopped up on khat appeared. They were aggressive and even though they had no leader they were certainly up for having a pop as some Americans. 


Khat chewers arrive

USMC take cover near the compound

The USMC took up positions in cover and fired on the newly arrived rebels, as well as those in the compound. They thinned out their opposition with discipled fire, and when the rebels managed to return fire it proved ineffective. Unfortunately for the marines the sound of their fire drew more PRA militia flooding into the neighbourhood, eager for a fight. The marines were forced to spend a second round thinning out the militia instead of assaulting the compound, and meanwhile the clock was ticking. 

USMC forced to stay in cover rather than assault the compound
 The end of turn three saw the arrival of a new threat- a mixed mob of unarmed but very angry Zugandan civilians intermingled with armed professional PRA gunmen. This was  particularly difficult because for the Americans who needed to avoid civilian causalities. In addition a 'technical' arrived as the result of a Fog of War Card. 


A combined mob of armed gunmen and unarmed anti-American protesters


At this point Vlad made an interesting tactical choice. He ordered the marines to disengage, and withdraw off  to their exit point rather than assault the compound. This gave him 4VP, and gave the PRA 5VP. He reasoned that the extra turn he had spent driving off the reinforcements had meant that it was impossible for him to destroy the cache before turn 4, and would have been very difficult to have achieved this in time to withdraw off the board by the end of turn six (that would have gave him 7VP). The best he could have managed was to destroy the cache but not withdraw (for 5VP), and to do this he would have had to risk an aggressive assault on the compound and a close quarters battle. If two or more marines had been killed, or some of the angry civilians had been killed by the marines, then he would have lost the battle more decisively. 

I think Vlad was unlucky when two large mobs of gunmen arrived at the end of turn 1 and turn 2, and very close to the PRA compound too. This cost him a turn, and his assault lost momentum. With an asymmetrical engagement the key is to keep aggressive and keep moving- the fact that the rebels were being reinforced each turn meant that if the marines got stuck in a protracted fire-fight then they are going to get bogged down by the rebels superior numbers. 

Vlad's choice was interesting, as it showed the dilemmas a real commander would face on the battlefield. Some risks are worth taking, and others are not. Perhaps with an aggressive attack Vlad could have cleared the compound and destroyed the munitions cache. Certainly the PRA have been significantly weakened by the USMC attack but CQB is never without risks. As it was Vlad chose to bring his men back to barracks unscathed- a minor victory for the PRA for sure, but a good day for the marines too.

I would like to come back to this mission, perhaps with a few minor tweaks to even things out a bit.We could give the marines an extra turn to complete their mission, or some extra fire power. An other idea is to have it as a night mission with the marines in NOD gear and the Khat chewing gunmen extra sleepy (although this might throw things too far in favour of the marines). 

Tuesday, 23 February 2016

Force on Force AAR: Contracting Troubles

The US Offensive on the PRA rebel held town of Churchill continues. CIA Agents trying to obtain solid intel on the positions of PRA forces in the town came under fire from militiamen loyal to the PRA, the operative and her driver were both wounded in the attack. UAV drones indicated that the agents were alive but were surrounded by militia and in a neighbourhood expected to be hostile to the American troops. A patrol of US Marines was near by and battalion HQ redirected them to extract the agents as expeditiously as possible. The marines were forced to abandon their AFV due to roadblocks- leaving one fire team to guard their extraction point (off board) the team leader proceeded on foot with two fire teams, 

This mission is simple, but requires good luck and a lot of speed. There is only six turns, which means the Marines will have to hoof it if they want to compete the mission. They can't afford to get bogged down in a protracted fire-fight with the militia, as that will draw in the whole neighbourhood and it's going to end up like Mogadishu all over again. The luck element comes in because the militia forces are reinforced at random each turn, and from a random location on the board. If the rolls goes badly for the US they can find they have a whole bunch of militiamen cutting off their exit. If they are lucky then the militia will arrive piecemeal and not present too much of a challenge. 
The marines (Regulars with D8/d10, with body armour) are much better than the militiamen (Irregulars, D6/D12, No body armour) but the constant reinforcing of the militia each turn can mean that the militia forces can eventually overwhelm the US marines with shear weight of numbers. 

James took the roll of the Marines, and because Vlad couldn't make it I played the Africans. It was James' first game of FoF. 

USMC entering the neighbourhood on foot

 The Marines entered the neighbourhood and positivity identified the two US Agents in cover by their wrenched car. They also identified a number of militiamen sheltering in a near by house, taking pot-shots at the injured agents.  The team leader lead his men into cover with good sight line of the intersection and opened fire on the militiamen, injuring two of them, including their leader. The militia retuned fire without effect. 


Militiamen threatening the US agents

US Agents sheltering by their wrecked car
 The second marine fire team them proceeded to advance rapidly through the shanties, using all available cover to reduce the line of sight from the militia.  More militia started to arrive but they had no leaders and so instead of fighting they just milled about, chewing chat and acting tough, firing AK's into the air etc. That sort of behaviour might intimate the average Zugandon villager but didn't impress the Marines. 

Second fire-team making their way to the agents

The team leaders fire-team went on over-watch, effectively countering the militias attempts to prevent the marines advancing. The second fire-team closed on the militia in the house closest to the US agents, and succeed in neutralising the opposition during a close quarters  exchange of fire. They then rescued the injured agents and proceed to exact them down the same route the had arrived by.  The militiamen in the surrounding buildings attempted to stop them but the fire-team on over-watch responded with effective fire and the team managed to move back into cover with the injured agents. 


Second fire-team extracting the injured agents

More militiamen started poring in, attracted to the sounds of gun fire. One of the militia groups had a leader, and he finally got them organised. The Marine squad leader's fire-team, on over-watch, found they had a lot of work to do, but they performed well, laying down a storm of fire that kept the militiamen away from the fire-team with the agents.  More militia arrived and threatened to cut off their exit point but they were leaderless again and failed to do much other than acting tough. One guy with an RPG, who was well positioned to attack the second marine fre-team, realised he had forgotten to bring the ammo and was effectively holding a piece of piping (the result of a fog of war card). 
A hornets nest of angry militiamen

Finally the second fire-team extracted their targets safely, and then the squad leader lead his fire-team back to the extraction point, before heading back to base. 


The second fire team extract the injured agents safely

The squad leader leads his men back to their AFV for exaction
This was text book stuff- the two injured agents were extracted by the marines and the marines never suffered a single casualty. As I said earlier this mission is supposed to be tricky for the marines and really requires a lot of good luck on the dice rolls. Fortunately for James he has never been short of luck with the dice,and my reserves kept arriving without leaders, then failing their quality roles so that they couldn't activate unless fired at by the marines (which James was sensible enough not to do). James also never failed a reaction test so that meant that every time I tired to fire at him he blasted away at me, reducing the effect of my shooting. That said, I can't take the victory away from James- he performed well, using one fire team to over-watch the other, and using cover very effectually to block line of sight. 

Tuesday, 9 February 2016

Force on Force Battle Report: A few Blocks of Hell

The US contribution to I-Coz has been scaled back over recent months, with many US Army personal withdrawn to bases, but the US Marine Corps continue tocombat the Peoples Resistance Army (PRA) in the coastal areas of Zugando. A resent push by the PRA southwards from Seatown along the coast road have threatened the fragile stability of the coastal region. The dismal performance of the Zugandan Army lead to the PRA capturing the sea port of Churchill. The USMC have been tasked with driving the PRA back out of Churchill and retaking the town. 

Intel on the ground is sketchy, but it is known that PRA 'regulars' are in the town, as well as large numbers of militias (of questionable quality) from Seatown.

I played 'A Few Blocks of Hell' out of the FoF rules as an introductory game for Vlad. I used the game right out of the rule book, only substituting USMC figures for US army, PRA Regulars for Syrian Jihadists and African Militia for Iraqi Irregulars. 

Vlad's brief, as the USMC, was to take two squads (9 men each) through a neighbourhood of Churchill to take two strategically important buildings - the burned out mission building and the watchtower. Ideally he should have both teams at over half strengthen in the two buildings by turn 4 for a clear win. Failing this he needed to take both buildings by the end of the game (turn 6). We decided not to have Victory Points for capturing people as when I have played this mission before it had too dramatic an effect on the results, distracting from the main mission. 
My mission was simply to stop the USMC getting into and holding the buildings before the end of the game. 

The Set Up

The lay out of the shanty town around the mission building. 

In addition to armed militia in the streets there were several units of militia hiding in the buildings. The militia in the bicycle repair shop proved particularity well placed to delay the Marines.
At the beginning of the game this unit debused from their VW camper van, looking for a fight. They found it!
Other militia men take advantage of an excellent firing position to attack the Marines in the street below.

The Mission


US Marines entered Churchill, taking up covering positions near the  market. One fire-team positivity identified a group of men by the VW van as hostile militiamen (the were waving AK47's and RPG7's around in an aggressive manner) and their team leader instructed them to open fire- causing casualties and pinning the militia. 
A second USMC fire-team sprinted towards the mission building, but the militia in the bicycle repair shop spotted them and opened fire- causing two casualties (one of them serious). The other two fire-teams took up positions to cover the market.
The PRA regulars headed towards the watch tower and the mission building to protect them. One team took up position in the watchtower with an excellent view of the whole neighbourhood. 
The militia on the roof of the two story building fired down onto the marines in the street- seriously wounding one. 


Turn two saw the Marines advance stall as they were forced to deal with their serious causalities. They fired on the militia on the roof top- wiping them out. The bicycle repair shop, despite being only made from breeze block, proved good enough to protect them against the majority of the marines fire, and the militia retuned fire, seriously wounding two more marine (who were evacuated off the street to a waiting medic station).

PRA Regulars taking up position by the burnt out mission building

The PRA regulars commanding a good view from the top of the watchtower


Turn three, four and five belonged to the marines, as the when aggressive. The militia by the VW got struck down by a mortar shell that tore them apart (a Fog of War card) . Two Marine fire-teams fired on the PRA in the watchtower killing two and seriously wounding another two- leaving only one combat effective. The last remaining PRA  raced into the mission building, closely followed by a marine fire-team. A violent close quarterer battle ensued, in which the marines killed all three remaining PRA members, securing the Mission Building.

USMC secure the burnt out mission building
In turn six the only militia still in the fight were hold up in the bicycle repair shop. A fire team of marines tried to assault them, but came off worse in a fire-fight, with two of the marines KIA. The militia finally gave in to the pressure of the marines fire-power when a fire-team seized the watch tower and opened up on the bicycle repair shop with UGLs and GPMG, reducing the breeze block structure to rubble and wiping out the defenders- 


Marines capturing the watchtower

The marines took had two killed in action, 4 seriously wounded and 2 lightly wounded. They had taken out all the militia and PRA fighters (40 militants in total) with at least 10 of them as comfirmed kills. And they had seized both objective buildings by round 6. A bloody affair, but there was no question who had won. 

Wednesday, 20 May 2015

Militiamen with Bad-Ass Hyenas

  Worrying report have been circulating of PRA militiamen training hyenas as attack 'dogs' for some time, but last week intrepid photojournalist Felix Champ managed to photograph them. Quite how wide spread this practice is is difficult to say, but there have certainly been repost of PRA commanders keeping the viscous animals as pets. 
  The local CIA commander was unimpressed by the reports. He was quoted as saying "TIA. This is Africa. Things like that happens every day." 


  Don't think I have taken leave of my senses. Some gangs in Africa actually do like to keep Hyenas as 'pets' because it makes them look bad ass. If you Google images of pet hyenas you will found plenty of pictures. 


In Call of Duty the African gangs use hyenas as attack dogs, which kind of gave me the idea. The CoD mission 'Fatal Extraction' was really the inspiration for me to start Zugando anyway, so hyenas have been on my 'to-do' list for a long time. 

Call of Duty hyena


I have converted these figures. They were from the Northstar Africa range, and I added collars and muzzles from Green Stuff, and added chains from the local bead shop. The militia are from Spectre Miniatures. I painted six hyenas, but have now decided that is a bit excessive, so two have been re-based to use in a post-apocalypse setting like Across the Dead Earth. 

Sunday, 17 May 2015

PRA Militiamen for Spectre Miniatures

Asymmetrical engagements are where it is at, and I am pretty sure you can't have enough militia. Hordes of gun-toting, dope-smoking bad guys tearing through the town on gunned up Toyota technicals! 
  Does it get any better? 
  Here are some more militiamen for my PRA forces. I have used the figures from Spectre Miniatures that I got when I backed their Kickstarter last year. They are nice figures, with some good detailing. Scale-wise they fit better with the Empress miniatures that with The Assault Group. 

The Headman

Some Flunkies

Saturday, 10 January 2015

More Firepower for the People's Resistance Army

The PRA continue to solidify it's control over the inland areas of Zugando. Here you can see their latest additions to their arsenal.  


.30 calibre Browning HMG on tripod mount (Note these were from The Assult Group's Vietnam range, with a bit of Green Stuff to change their hair to 'African' hair.)


More PRA 'regulars' from TAG.


A Soviet-era Russian-made DShK HMG on anti-aircraft mount. Useful to prevent helicopters attacking your positions. This one is manned by a couple of militia men (Made by Eureka).

Saturday, 3 January 2015

High Value Individual #5: Thomas The Butcher

Thomas Mukaka (AKA Thomas the Butcher, AKA Bloody Tom) is a local leader of the PRA Militias. Unlike many PRA leaders, Mukaka has no military experiences, but instead has risen from the ranks of the militia. He has achieved his success by a combination of brutally and ruthless cunning. His men fear him more than they admire him. His drug fuelled paranoia and callous disregard for human life has led to him murdering a number of his own lieutenants.


Mukaka has come to the attention of the I-COZ intelligence services when he executed two western aid workers. He killed them because he feared the SAS would try to rescue them, although in truth the SAS were busy in another part of Zugando, and has no plans to attack Mukaka. After the murder of the aid workers the UN diplomats who had been trying to secure the hostages release decided it could no longer negotiate with Mukaka and, ironically perhaps, the SAS have been tasked with removing Mukaka. 

Friday, 30 August 2013

AAR: Contracting Troubles

My regular gaming buddy, Pulp Citizen,  and I thought we would get on and do some gaming in Zugando. We used the mission 'Contracting Troubles' straight out of the rule book, only we substituted Zugandan Militia for the 'insurgents' and Nigerian Army(NA) for the USMC. 
Because we are new to FoF my son Charlie offered to step in and play the NA while I refereed the game, which was a great help as it left me free to concentrate on remembering the rules. Even so, I still managed to miss out some crucial rules.

Mission Background

In our Zugandan inspired interpretation of this mission, the background is that Rex Saddler and Lance Waverly, two intrepid war correspondents,  have been trying to track down wanted war criminal Henry Gwapondi in order to get the scoop of the year. Unfortunately they upset some of the locals, who are actually supporters of Mr Gwapondi. They decided to beat a hasty retreat back to Victoria Town, but unfortunately their van broke down before they could reach safety.  The reporters managed to get off a satellite phone call to their office in Victoria Town, who alerted the UN.
Luckily for Rex and Lance the Nigerian Army had a patrol in the area. They tasked a section to bring back the reporters. The NA patrol had to abandon their truck because of a road block, and had to proceed several blocks on foot. 

The mission starts with Lance and Rex hunkered down behind their broken down van, while a hornets nest of local militiamen begins to gather around them. 


After Action Report

The first run through of this mission went very well for the NA, commanded by Charlie. Charlie got very lucky on the Fog Of War cards, while Pulp Citizen rolled badly for his reinforcements. Charlie moved Fire Team One into a commanding position for over-watch  and sent Fire Team Two towards Rex and Lance. Fire Team Two got shot up, and were forced to take cover in a shack. Fire Team One moved forwards to try to complete the mission.


Throughout the game Charlie was amazingly lucky with his first aid rolls, and his Fire Team was lucky to walk away from a hail of fire with just one lightly injured casualty. 

Charlies luck held, as the Nigerian platoon commander decided to send reinforcements in the form of an anti-tank team with an RPG7. Pulp Citizen's militia had no tanks, but the RPG's added plenty of firepower, forcing the militiamen to keep their heads down. 


Fire Team One managed to make it to Lance and Rex, thanks to another Fog Of War card that made them immune to the effects of moral. Then they hot-footed it at rapid move back across the street.  The militiamen attempts to stop them were hampered by confusion in their command and control (another Fog of War card), and the Nigerian Peace Keepers manged to extract themselves, and the two reporters,  out of the village and back to safety.  They only took two light casualties, and has killed six militiamen- A great success for the Nigerians!


It is worth noting that this was our first run through of this mission and we made a few mistakes that would have effected the outcome of the battle. Firstly, we allowed the Nigerians to rapid move off the board, but they shouldn't have done that with dependents (ie Lance and Rex). Also we added two defense dice to the fire-team which Lance and Rex joined, but dependents don't add defense dice. This made the fire team very durable. 

Charlie's ridiculous luck was also a factor. The random nature of this mission, with variable reinforcements, and the variable Fog of War cards, played in favor of Charlie's Nigerians. When we had a second run through, with me playing the NA against Pulp Citizen's militiamen, I was badly mauled. I had three KIA,  and six seriously injured, and failed to rescue the reporters!

Pulp Citizen expressed concern that the mission was too random. With variable reinforcements  and Fog of War, it was really down to chance. We went through the Fog of War deck and took out a lot of cards we both felt were game changing, and both felt better about that. We really need to play some of the other missions, perhaps one with more symmetrical forces.


Over all verdict- lots of fun. Faced paced and exciting. 

Saturday, 27 July 2013

Armed Militiamen

Weapons are common place in zugando, and there are countless militia groups and paramilitary, often organised on tribal grounds, and allied to the various factions. To the outsider this complex mess of tough armed groups seems impenetrable: even the zugandans don' t always understand the situation.
The People's Resistance Army have large numbers of militiamen in their ranks. Most are poorly armed, and poorly trained, and yet I-COZ forces have reported that the tend to remain in the field longer than might be expected for troops of that quality.


I have finished about 30 militiamen, and these two technicals. The figures are mostly by The Assault Group, with a few Britannia Miniatures thrown in. The technicals are by Britannia, and the Ford van is by Sloppy Jalopy.

Sunday, 12 May 2013

The Zugando People's Resistance Army Militia

Here are my latest team of militia for my PRA force. I painted these for the Lead Painters League competition over on Lead Adventure Forum.  The figures are from The Assault Group.


Tuesday, 7 May 2013

AAR: The Fanno Casa Raid


Followers of my other blog, Four Colour Super Minis, will have to forgive me, as this is a repost of an AAR from that blog from last year. For anyone who missed it, this is the Fanno Casa Raid. Enjoy. 


My son Charlie and I finally got round to playing our first game of Force on Force some 9 months after I started the project, building an African shanty town. We played the game out of the rules called ‘A Few Blocks of Hell’ but as it was set in my fictional West African country, Zugando, we substituted the US army for SAS and Delta forces, and changed the insurgents to rebel militia and Zugando Peoples Resistance Army.

Charlie took command of the coalition Special Forces, while I played the Zugandan rebels.
The main mission was for the SF to get into the target buildings (the watch tower and the ruined church) by the end of turn 4, and hold them until the end of turn 6).

SAS forces, under Captain Price, intercepted information that the PRA forces were massing for an offensive. The PRA has been stockpiling weapons and fuel in the village of Fanno Casa. Their intelligence suggests that the stockpile is in either the ruined church mission or in the guard station in the center of the village. A squad of PRA soldiers were protecting the site from thieves, but intelligence suggest that the village also has a sizable number of militiamen loyal to the PRA who will no doubt come out to fight too.


A combined force of 18 special forces men drawn from SAS and Delta Force were tasked to locate and destroy the supply dump to delay the PRA attack. They were supported by a SAS light mortar crew firing form the jungle. They would approach the village from the south, through the jungle under the cover of darkness, and attack just before dawn. 


PRA soldiers form the 'elite' part of the rebel army

Militiamen congregate in the market place of Fanno Casa

Spud is down!
Early in the battle the Delta Force took a casualty

Captain Price leads his men onto a roof top from where they provide
overwach and he directs deadly accurate mortar fire.  

An overview of the market place of Fanno Cassa. The church and
watchtower are on the left hands side in this photograph.

The local PRA commander directs the battle from the balcony of a  small hotel,
until he is shot and wounded by one of Captain Price's team.

Having fought their way through the market place of Fanno Casa, the Delta  Force fire team
stack up on the ruined church, ready to breach. 
Following a vicious street battle the Special Forces overwhelmed the PRA men, and captured the church and eventually the watch tower. The supply dumps were destroyed and the SF were extracted by helicopter  along with five prisoners, including a PRA officer. Unfortunately two of the Delta Force were KIA and three of the SF were seriously wounded, although by delaying the PRA offensive, their sacrifice saved countless lives.